A lot has changed since this article was published a year ago. It’s really hard to keep your writing updated. I think I’ve for the most part succeeded this past year and these articles will be helpful to you. But I want to warn you that there may be updates in dependencies or Gutenberg itself that might need some care if you’re following my examples. I try to write updates as I learn about changes, so also take a look at my most recent posts.
Prerequisites:
Gutenberg Blocks may seem overwhelming, but I’m hoping to clear away just enough details so that we can see what’s going on at the heart of this new editor. I’m assuming that:
- You’re familiar with some build processes with babel
- You’ve done enough React to be familiar with JSX
- You’re primarily Javascript/html/css focused.
Outline:
Here are the steps we’ll take to get a block loaded in the Gutenberg editor. We plan on making a single block with pre-rendered text. (No interactivity, CSS, fancy stuff yet)
- Set up WordPress and a folder structure
- Create a build process with webpack
- Call the block’s javascript into the editor with php
- Register a block with javascript
To see the finished product, you can see the repo here
WordPress Gutenberg and folder structure:
Make sure that you have installed and activated the Gutenberg plugin.
I use local by flywheel to quickly spin up instances of WordPress. Whichever way you choose to set up your WordPress, you’ll need a folder inside of your plugins folder with your plugin title.
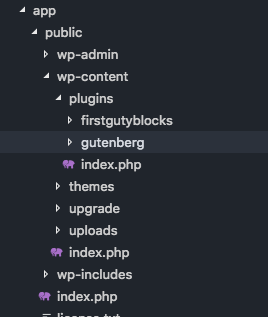
Inside this firstgutyblocks folder we will have a php file that I’ve named “firstgutyblocks.php”. This will contain the plugin information. You’ll need to include these comments so WordPress knows what to do with this file:
<?php
/**
 * Plugin Name: First Guty Blocks
 * Description: Our first Gutenberg Blocks!
 * Version: 1.0.0
 * Author: Jim Schofield
 *
 * @package firstgutyblocks
 */

// Exit if accessed directly.
if ( ! defined( 'ABSPATH' ) ) {
	exit;
}
➡ Before moving on, go into wp-admin and activate our plugin!
Set up the Gutenberg build process
Time to set up Webpack
Webpack’s role is to transpile our JSX into friendly javascript. If this is unfamiliar to you, take a look here and check out babel. There are ways to write code in vanilla javascript instead, but I don’t recommend it. JSX is the bread and butter of React applications, and if you look at the source code of Gutenberg, that’s about all you’ll see. So it’s best to get comfy with it 🙂 It’ll save you time in the long run.
In the terminal, go to your firstgutyblocks folder and init npm.
npm initIt will ask you to fill in information like project names, etc., but you can just go with defaults (just keep pressing enter). Then, install some dependencies:
npm install --save-dev webpack webpack-cli babel-loader @babel/preset-react @babel/core @babel/preset-envThat’s a lot… so here’s the what and why for all of those things:
- webpack – our asset bundler/task runner of choice today
- webpack-cli – allows us to use some commands in the command line that are useful
- @babel/core – the thing that will transform our bleeding edge javascript into plain ol javascript
- babel-loader – allows us to use babel inside of webpack
- @babel/preset-env and @babel/preset-react – basically the rules babel follows to transform our javascript
So now that we have all of those dependencies, let’s start making webpack work…
We’ll need to create a webpack.config.js file in the firstgutyblocks folder and configure it to build what we want, where we want, how we want:
// node module that let's us do file system stuffs...
const path = require('path');

// Webpack expects an exported object with all the configurations, so we export an object here
module.exports = {
    entry: './src/index.js', // Where to find our main js
    output: {
        // where we want our built file to go to and be named
        // I name it index.build.js so I keep index files separate
        filename: 'index.build.js',
        // we're going to put our built file in a './build/' folder
        path: path.resolve(__dirname, 'build')
    },
    module: {
        rules: [
            {
                // basically tells webpack to use babel with the correct presets
                test: /\.js$/,
                loader: 'babel-loader',
                query: {
                    presets: ['@babel/preset-env', '@babel/preset-react']
                }
            }
        ]
    },
    // Webpack yells at you if you don't choose a mode...
    mode: 'development'
}
Now… we’re about to actually run webpack.
First, let’s go to our package.json and add the following to our “scripts” key:
...
"scripts": {
    "build": "webpack"
    "test": "echo \"Error: no test specified\" && exit 1"
}
...
This is a convenience thing- to run a build we type “npm run build”. If you do it right now, you will see an error because we don’t have a javascript file yet…
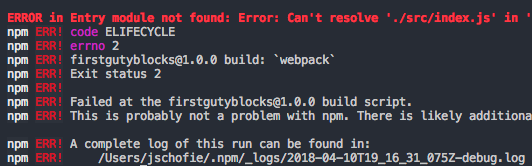
So let’s make a “src” folder and create an “index.js” in that. I’m going to add this code to said index file:
const message = <h1>Test JSX!</h1>;
console.log("Hello World!");
And now if you do “npm run build” again you should have a nice, pleasant, build message!
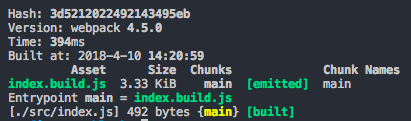
So what’s with the javascript that I added? Well, first, I want a console log that’s run when the script is loaded letting me know when the javascript is loaded and working correctly in the editor. Second, I want to make sure that the transpiling is taking place when I run webpack. So if I try to use jsx as I am on the first line, it will fail when I try to run webpack if something’s not configured or installed.
So far, we have webpack building our javascript into a file in the build folder, and our plugin folder should look like this:

Calling the javascript in php
Now, we actually want WordPress to take that javascript and load it when we open up the shiny new Gutenberg editor. So we go back to the plugin file and add a function that’s called in a new shiny WordPress hook ‘enqueue_block_editor_assets’. Basically, we want WordPress to know about our new Gutenberg block and where the javascript file is located. Let’s add to our ‘firstgutyblocks.php’ file…
/* this function name I believe is arbitrary, but I
* generally see  people follow
* {namespace}_{blockname}_editor_assets as a
* naming convention
*/
function firstgutyblocks_hello_world_editor_assets() {
    wp_enqueue_script(
        // the name - also generally {namespace/blockname}
        'firstgutyblocks/hello-world',
        // where the javscript is located
        plugins_url( 'build/index.build.js', __FILE__ ),
        // and dependencies WordPress needs to serve up for us
        // you must have these two for the most basic block
        array( 'wp-blocks', 'wp-element', 'wp-editor' )
    );
};

// and then, we actually have the function run when the editor loads...
add_action( 'enqueue_block_editor_assets', 'firstgutyblocks_hello_world_editor_assets' );
OKAY. NOW we can actually log in to WordPress and open a page or a post. If all goes well, you will now be rewarded with a “A Guty Block is Present!” console log when the editor starts up. You’ll need to reload the editor if it’s already open.
So we haven’t actually made a block or added it to the editor yet. Most of the battle has been fought, we’re almost there…
Register our block in javascript
We have a process to get Javascript building. We have our one javascript file loading when the editor loads. Now it’s actually time to create the block in javascript!
Let’s go back to the index.js file and remove the work before. First, let’s get what we need to register a block:
const { registerBlockType} = wp.blocks;
// using destructuring to basically do:
// const registerBlockType = wp.blocks.registerBlockType
wp.blocks is provided for us on the window already. We need to retrieve this function to register our block:
const { registerBlockType} = wp.blocks;

registerBlockType('firstgutyblocks/hello-world', {
        // We put the Guty config stuff here
    }
);
The method registerBlockType takes two arguments. The first is the block is the block’s unique name. The second a config object. This config object is where the React part takes over. Let’s fill in that object now.
const { registerBlockType} = wp.blocks;

registerBlockType('firstgutyblocks/hello-world',{
        // We put the Guty config stuff here
        title: 'My First Guty Block!', //Title seen in the editor for the block
        icon: 'smiley', //using WordPress' dashboard icons
        category: 'common',

        // edit is basically the 'render' function for your block.
        // It can be a live react app inside the editor.
        edit() {
            return <h1>Hello Editor!</h1>;
        },

        // save is the 'render' function, but it's used to generate a static html
        // string, and it is not a live react app.
        save() {
            return <h1>Hello World!</h1>;
        }
    }
);`
When you load the editor, you should be able to select “My First Guty Block!” You should then see a static h1 element saying “Hello Editor!” If you publish, you would see a static h1 element on the page saying “Hello World!”
Review
We’ve set up a WordPress plugin to register a Gutenberg block and load this block in the editor. We’ve set up a webpack build process to build all the files we need.
Although this static example is not so impressive to look at, I promise that there are some exciting things possible in this new editor. I plan to write some more articles on how to make make interactive and truly WYSIWYG blocks, adding CSS, and doing advanced things like API calls and rendering react applications on the front end.
In the meantime, I have a repo of some general blocks I’ve been playing around with if you’re interested.
If this is the easy way, I’m not at all sure I want to know the hard way.
A lot of people share your feelings here. Admittedly, there is a lot of overhead.
no doubt
Can we build Gutenberg blocks without using webpack? I’ve always used CodeKit for compiling but having trouble working out what settings it needs to compile for Gutenberg.
I’m not too familiar with codekit, but looking at their site it looks like you can transpile JavaScript as one of it’s options. Just make sure you are transpiling using the babel react and babel jsx presets.
I don’t recommend it, but you can also write in vanilla JavaScript with no transpiling, but I’ve found that to be… unpleasant. You can see more here https://reactjs.org/docs/react-without-jsx.html
Thanks heaps 😀
I’ve followed this to the letter, but I keep getting an error on npm run build. ERROR in ./src/index.js
Module build failed (from ./node_modules/babel-loader/lib/index.js):
Error: Cannot find module ‘@babel/core’
babel-loader@8 requires Babel 7.x (the package ‘@babel/core’).
My npm install is up to date.
At first glance it looks like you may just be missing babel. Can you try running:
npm install --save-dev @babel/core @babel/preset-envThis is what you want: https://github.com/ahmadawais/create-guten-block
Takes care of all the stuff behind the development
Yes, this is a tool you can use and I’ve tried it before. It doesn’t help you understand what’s going on though, and when I had used it it was extremely slow. I prefer to build something lighter 🙂
I think in the webpack config you need to change:
presets: [‘babel-preset-env’, ‘babel-preset-react’]
to
presets: [‘@babel/preset-env’, ‘@babel/preset-react’]
Thanks for the tutorial.
Thank you! I just updated it.
This is the best tutorial for getting started with Guternberg for people who want to keep things organised, not the create-guten-block way. Hope you keep it updated.
You are awesome man!
What a great introduction to this topic, thanks!
I came here hoping to find out how to build a Gutenberg block w/o requiring NPM and a build process, so I could learn it incrementally. I have heard it is possible to build blocks without a build process; is that something you could illustrate in a post?
Hey Mike, Definitely! I was actually planning on doing a post about just that very soon. WordPress does a really good job of giving examples without javascript compiling, and there are ways to use libraries that allow runtime compiling. Stay tuned!
In the meantime… take a look at this: Blocks without a build step. I’m going to do my own take of this, but Weston Ruter does a great job showing a library that allows you to use JSX-like stuff without a build step!
Great tutorial! Any plans to add UglifyJsPlugin to minify the code?
Thank you very much for the tutorial.