This is the second part of a WordPress Gutenberg Blocks series. To follow this I’m assuming you understand part 1. The repo for part 1 is located here if you want to pick up where we left off. The completed source code here is available in that repo in the branch ‘article2/richtext‘
A lot has changed since this article was published a year ago. It’s really hard to keep your writing updated. I think I’ve for the most part succeeded this past year and these articles will be helpful to you. But I want to warn you that there may be updates in dependencies or Gutenberg itself that might need some care if you’re following my examples. I try to write updates as I learn about changes, so also take a look at my most recent posts.
Outline:
We left off last time with a very boring block. We did the minimum to get something to show up in the editor (and that was enough for one article), but it didn’t show us why Gutenberg is going to be so fantastic at bringing true WYSIWYG to the WordPress editing experience. Our goals now are:
- Import a RichText component users can directly edit
- Hook in this component using Gutenberg’s “attributes”
- Deal with common errors in developing blocks
But before we start let’s make a minor adjustment that will save time. Before, we had to run “npm run build” every time we made changes to our javascript. Let’s create a command that will watch our files and automatically run our build when it notices file changes. Head over to our package.json and add the following:
...
"scripts": {
  "build": "webpack",
  "watch": "webpack --watch",
  "test": "echo \"Error: no test specified\" && exit 1"
},
...
We’re going to enter “npm run watch” and I’ll have it running for the rest of this article.
Importing the RichText Gutenberg component
Let’s change a few things in our index.js file:
const { registerBlockType } = wp.blocks;

registerBlockType('firstgutyblocks/hello-world', {
    title: "My First RichText Block!",
    icon: 'welcome-write-blog',
    category: 'common',

    edit() {
        return (
            <div>Only the editor will show this</div>
        );
    },

    save() {
        return (
            <div>Only the front end will show this</div>
        );
    }
})
So we’re changing the title, the icon, and the edit and save methods. If you were to run this in the editor, you would again have static text. One thing to point out- edit() will only be run in the editor. This is the living, breathing, react block that can have user interaction built in. When you hit “publish” or “update”, the editor will then run save() and spit out only what’s in that method. It won’t be a living react component, but simple html.
So edit() is used to create the block and modify it. save() spits out simple html to the post.
Let’s import the RichText component form wp.editor.
const {
    registerBlockType,
} = wp.blocks;

const {
    RichText
} = wp.editor;
Again, this is using object destructuring. We are taking registerBlockType and RichText from wp.blocks and wp-editor respectively and assigning them to their own variable so we don’t have to type out wp.editor.RichText every time we need it.
So what is the wp.blocks? Remember back in our php file?
function firstgutyblocks_hello_world_editor_assets() {
    wp_enqueue_script(
        'firstgutyblocks/hello-world',
        plugins_url( 'build/index.build.js', __FILE__ ),
        array( 'wp-blocks', 'wp-element')
    );
};
In wp_enqueue_script we pass in an array. That array declares the javascript dependencies that we need to do our block, and wp.blocks is thusly added to the page for us to use!
RichText is a pre-built component for Gutenberg blocks. It’s generally the way that you’ll create a field that the user can change the text in. Here is the RichText component documentation. You should check it out, because the prebuilt stuff for Gutenberg normally has a readme.md file outlining the intended uses of that thing.
So enough with the background. Let’s call this component in our edit() method :
const {
    registerBlockType,
} = wp.blocks;

const {
    RichText
} = wp.editor;

registerBlockType('firstgutyblocks/hello-world', {
    title: "My First RichText Block!",
    icon: 'welcome-write-blog',
    category: 'common',

    edit() {
        return (
            <RichText
                value='The stuff inside the input'
                />
        );
    },

    save() {
        return (
            <div>Only the front end will show this</div>
        );
    }
})
Make sure that you’ve saved and webpack built your file with no errors. Now load that block up in the editor!
When you do, you’ll notice that the value attribute is what shows up inside of the text box. You’ll also notice that if you try editing the component, you definitely can, but you’ll get errors in the console.
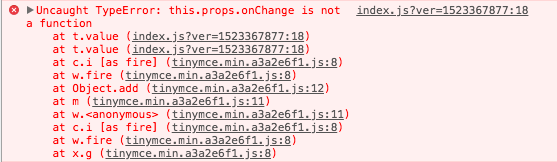
Right now, RichText is an uncontrolled input. This means, we haven’t hooked our input up to update react’s state. This should be familiar to you if you’ve built some react apps. If not, take a look at what it means to be controlled.
So RichText right now is complaining that it needs to know what to do when someone changes the input. We need to give RichText a function that instructs it on how to update the “state” whenever there’s a change. Gutenberg block doesn’t really have state the way a normal react app would, but instead has something called block “attributes.”
Setting up and updating attributes
We are going to add an attribute called “textString” to the block:
const {
    registerBlockType,
} = wp.blocks;

const {
    RichText
} = wp.editor;

registerBlockType('firstgutyblocks/hello-world', {
    title: "My First RichText Block!",
    icon: 'welcome-write-blog',
    category: 'common',

    attributes: {
        textString: {
            type: 'array',
            source: 'children',
            selector: 'h2',
        }
    },

    edit() {
        return (
            <RichText
                value='The stuff inside the input'
                />
        );
    },

    save() {
        return (
            <div>Only the front end will show this</div>
        );
    }
})- “attributes” is similar to setting initial state in a normal React component. To change something, you set attributes and the block will react to those changes.
- Attributes are encoded into the markup when you save. This way, when you load the page back up in the editor, the editor remembers what values each attribute had when you last saved the page. This is the reason for things like “selectors”. It’s giving Gutenberg information about where the actual data lies inside of the markup. In this case, it’s saying that “all the data for this attribute will be children of the h2 tag.”
- Why is it an array? Well, with RichText, technically you’re not just going to have a string there. You might add bolded text, italics, and line breaks, which might have dom elements like span tags or strong tags. React doesn’t think of this as a string anymore, but an array of elements. We have to let Guty know that the children of the h2 tag might be a bunch of dom elements.
- You can assign a type to the attributes, and also some other options like default values. See more here…
- To change attributes you use the setAttributes method, very much like setState in react.
TL;DR? You need to declare attributes that will store your field information from a block. This is like state from React.
We’re going to add a function “onTextChange” that takes the new RichText changes, and sets them in the attributes. There are a lot of changes we’re going to make in the edit() method:
    // props are passed to edit by default
    // props contains things like setAttributes and attributes
    edit(props) {

        // we are peeling off the things we need
        const { setAttributes, attributes } = props;

        // This function is called when RichText changes
        // By default the new string is passed to the function
        // not an event object like react normally would do
        function onTextChange(changes) {
            // works very much like setState
            setAttributes({
                textString: changes
            });
        }

        return (
            <RichText
                tagName="h2"
                value={attributes.textString}
                onChange={onTextChange}
                placeholder="Enter your text here!"
                />
        );
    },
I’ve added tagName here so that the text field will appear as an <h2> element. I’ve also added a placeholder because it’s a nice thing to do 🙂
If you refresh your editor, you should be able to add “My First RichText Block!” to your post or page. You should be able to edit it, and notice that the text should be showing like an h2 element.
Dealing with editor errors
We’re not quite done yet.
If we hit “update” or “publish” and view the page, you will see the words “Only the front end will show this”. This is because we never updated the save() method, and this method determines what’s actually saved to the page. Let’s change that.
// again, props are automatically passed to save and edit
save(props) {

    const { attributes } = props;

    // We want the text to be an h2 element
    // and we place the textString value just
    // like we would in a normal react app
    return (
        <h2>{attributes.textString}</h2>
    );
}
Once that’s saved, reload the editor. You will get an error that is very common while developing Guty blocks:
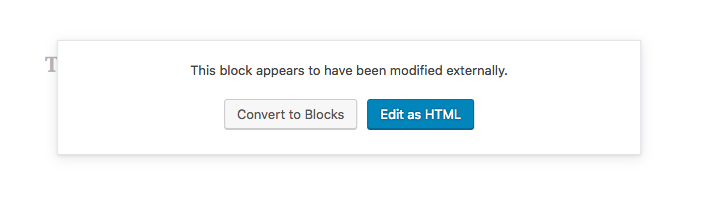
If you check the console you may get a message like:
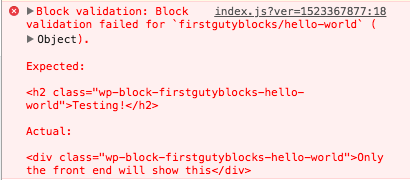
You’ll notice that the “Actual” in this message was the old markup. We saved our block previously with this markup and that’s what’s stored in the database currently. But our block has been recently changed, and Gutenberg is expecting the block to include h2 tags now. If the actual markup structure and the expected don’t match, the block explodes and you will have to remove this instance of the block and add a new instance back in.
This process is probably the most irritating part of Guty blocks. I hope that they find a good solution to this.
After you’ve removed your old block, added the block back in, and saved, you should now see your block show up on viewing the page with the correct h2 tags.
Review
We have edited our block to include a prebuilt WordPress component, and hooked that component into the attributes of the block. We also looked at how to handle markup differences when you load a saved block.
Hopefully, you could start playing around with this now and add your own fields that users could edit. You could try adding multiple fields with different element tags, or maybe play around with some of the options in the documentation. There’s also a simpler text editing field called PlainText you could try.
So now what?
These fields are going to be a huge part of making gutenberg blocks, but there are some essentials that we still need to go over:
- What ways can we add styles?
- How do we add images?
- How do we create those fancy tool bars above the blocks and in the advanced settings panel?
- How do we manage multiple blocks?
More to come!
This is how tutorials for beginners should look like.
Keep going!
Hello
When I add this
return (
);
In my browser console I see this error ‘Minified React error #130;’
how to solve this I am following every step you write but no luck
Thanks
Hey, I might need more context to tell what’s going on here.
But my first hunch is to not return and empty statement. Try adding a div like we did in the examples above:
edit() {
return (
<div>Only the editor will show this</div>
);
},
When React renders things from edit() or save() the jsx that is returned needs to have one parent element. So the above works, but if you tried to return sibling elements it wouldn’t work.
the “Actual” in this message was the old markup. We saved our block previously with this markup and that’s what’s stored in the database currently
==This part is really really irritating!
Yes it is more than irritating.
Thanks for the great work
Great!!
It worked for me, everything is working fine.
Thanks a million
Great Tutorial, finally one, that I understand. The blog validation error is really annoying. This makes it impossible to update a block if you already have content on the page and use the block. Or is there a solution for that?
I’ve hear that some have used a hot reloader from react scripts with success. I haven’t tried it out. I generally delete the block and reload in most cases and only test on dedicated test page. But yeah, annoying nature of the beast.
thank you very much for this tutorial … there is not much tutorial as clear on gutenberg because it is relatively new. I did part 1, I will also do the following parts.